
How To Make Skeleton Leaves with Printable Instructions

I’ve wanted to do this project for almost three years now, but couldn’t figure out how to make skeleton leaves.
I first saw this when I was pregnant with my first son and was looking at the décor in the doctor’s office.
They were pressed between two pieces of plexiglass and I thought it was the coolest thing ever!
I didn’t know what to call it when I went online to search how to even start making these. I searched “clear leaves” and “see-through leaves” and the only results I got were fake leaves made out of tulle and silk.
I also found leaves that were bleached white. This wasn’t what I was looking for either. I found out that these are called skeleton leaves.
I guess the name makes sense, since you’re actually getting down to the bones of the leaf.
Now that I figured out what to call them, I needed to know how to make skeleton leaves.
The companies that sold them sure as heck weren’t going to share their secrets on how to make a skeleton leaf.
I dug a little deeper and came up with a lot of sites from colleges talking about the very scientific side of making skeleton leaves and why the formula works. It was way too technical for me!
Figuring Out How To Make Skeleton Leaves
I found a tutorial on Pinterest, but after the cooking part, it seemed way too time consuming having to gently brush the skin of each leaf off with a tiny little brush (I’m so impatient), especially if making big batches of skeleton leaves.
I found these big sturdy leaves (I think they’re some type of palm leaf) in a park near our house and decided to try them out.
I had to make sure the leaves were waxy and veiny because they work the best. Here is my step-by-step tutorial on how to make skeleton leaves. Enjoy!


Skeleton Leaves
Ingredients
- Waxy Leaves
- Large Pot
- Water I used 12 Cups
- Super Washing Soda I used 2 Cups
- Metal Tongs
- Colander
- Bleach
- Shallow Dish
- Food Color
- Cooling Rack
Instructions
-
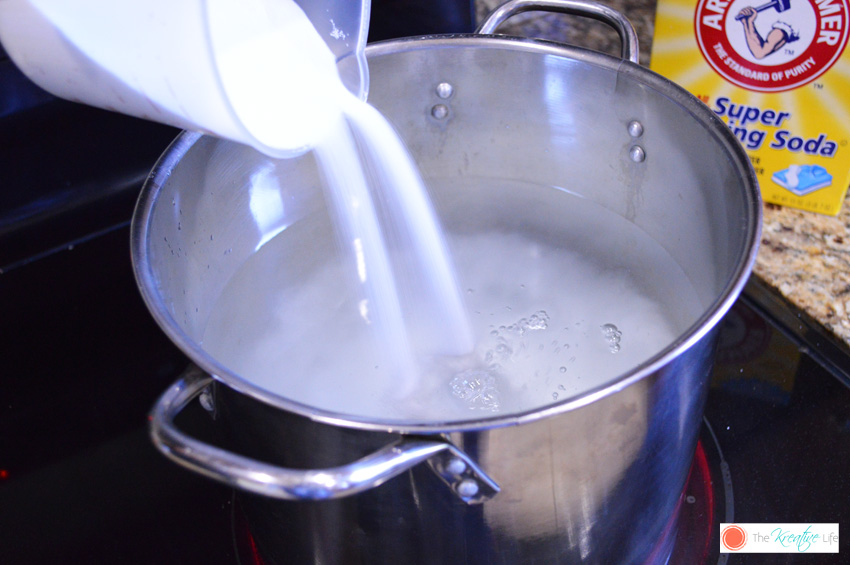
In a well-ventilated room, mix water and super washing soda in pot and bring to a boil.
-
Lower the heat to a simmer and add leaves. Allow the mixture to simmer for 2-3 hours.
-
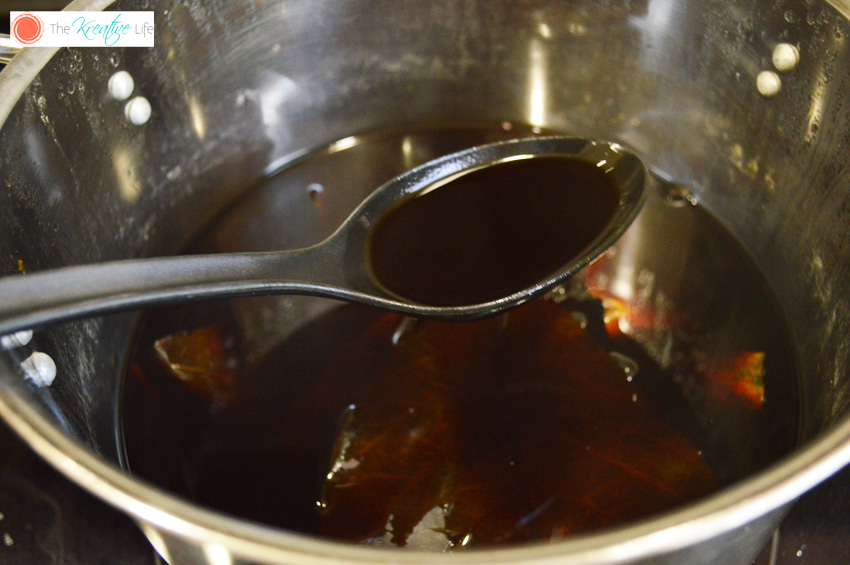
After the 2-3 hours, the water will look very murky.
-
Using the tongs, place the leaves in the colander and run under cool water.
-
(My leaves were pretty tough, so I don’t know if adding all types of leaves to the colander will work or if you’d have to rinse them individually if they’re more fragile.)
-
Pour out the murky water and rinse out the pot. Fill the pot with just enough water to cover the leaves.
-
It doesn’t have to be as much used before when simmering them. I added ½ cup bleach.
-
Place the leaves into the bleach water and allow to soak for 20-30 minutes. This will remove as much color from the leaf as possible.
-
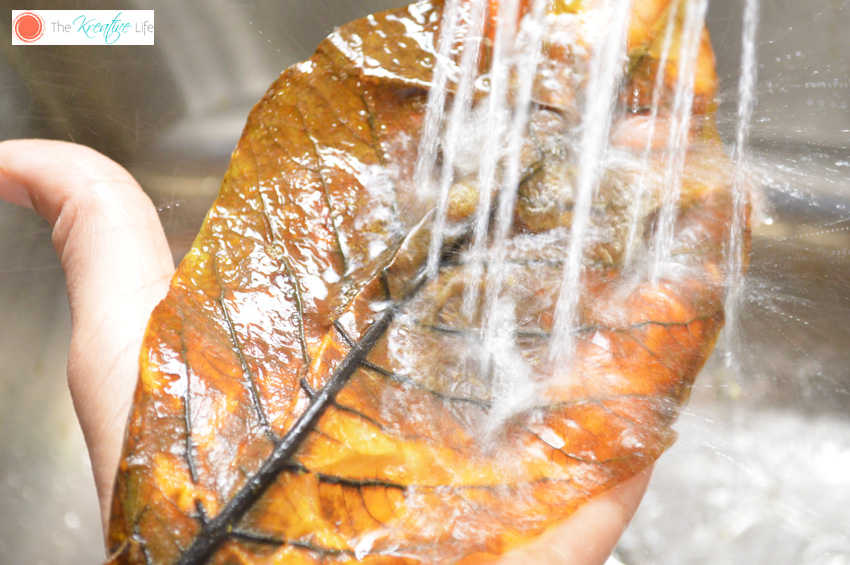
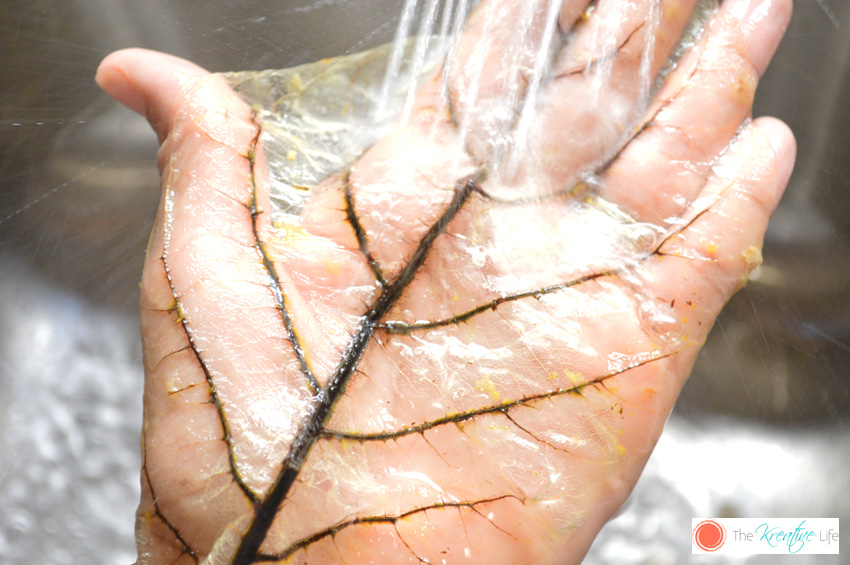
Now, this is where I did things a little differently.
-
Instead of using the brush to remove the skin of the leaf, I placed the leaf flat on my hand and ran it under the sprayer on my kitchen sink.
-
The skin started immediately coming off.
-
After about a minute under the water, the skin was completely removed.
-
I’ll admit that some of the leaves tore a little, but I still kept them because it added a little character.
-
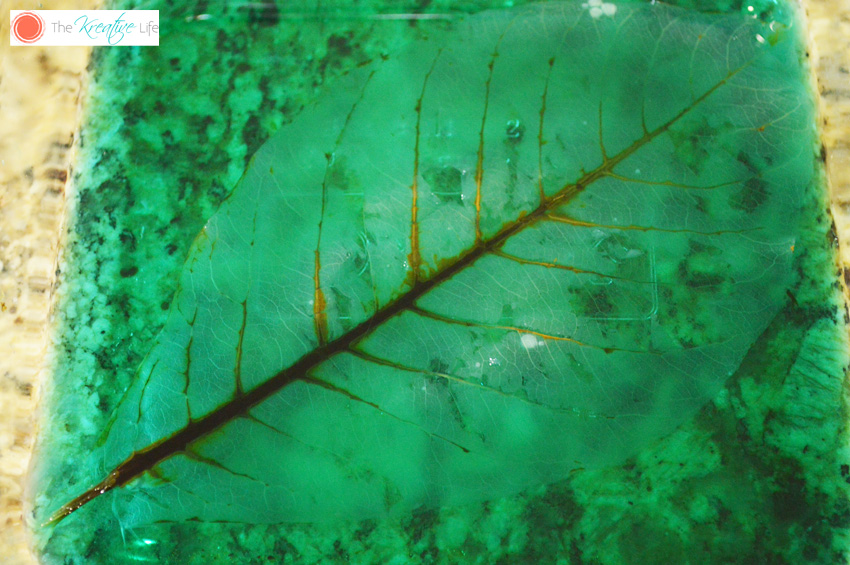
Mix water and in the shallow dish according to the tint you want.
-
I used a blue and green mixture.
-
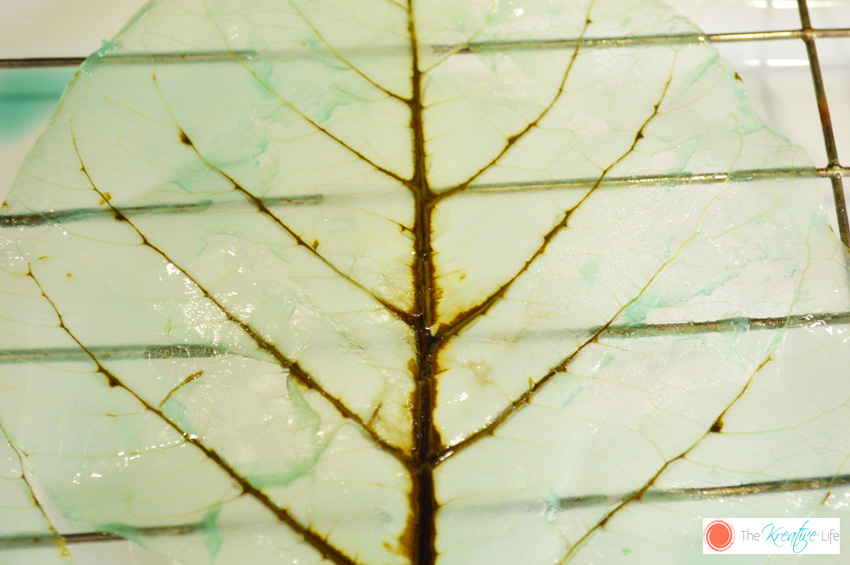
Allow to sit for 10 minutes. Remove from water and place on cooling rack. Allow to completely dry.
-
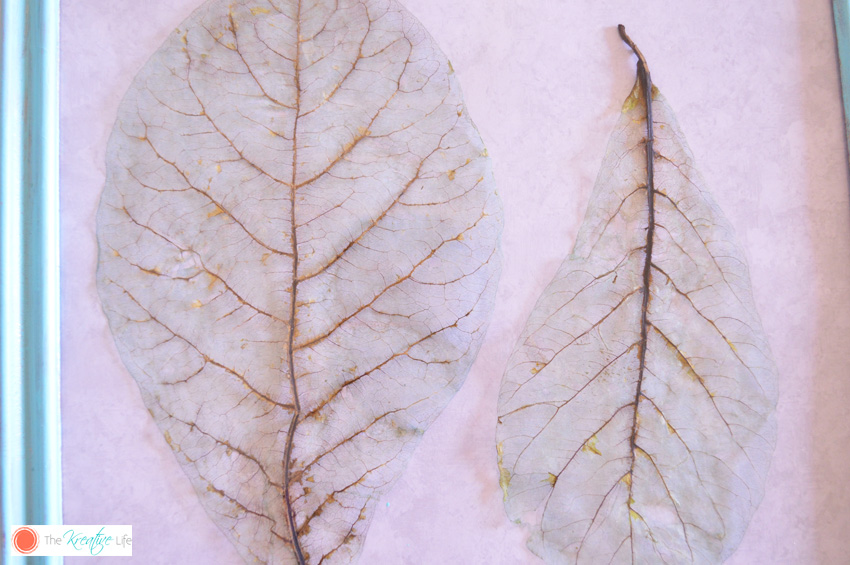
After mine dried, I painted a cheap frame and used a piece of scrapbook paper for the background.
*The amount of water and super washing soda will vary depending on the size and amount of leaves.
I would suggest using one part super washing soda to six parts water.


Related From The Kreative Life: 5 Fun All Activities for Families
Related From The Kreative Life: Natural Toilet Fizzies


Now that you know how easy making skeleton leaves at home is, what will you try next?
If you like home decor, then you may want to check out these diy floating shelves or this faux-stained wood plaque!


I love this and will be trying this out… love how you put them in frames so cool. Thanks for sharing 🙂
You’re welcome, Mary Jane!
hello,,i just saw this turtorial,and i got a question.and i also like to create kinda handmade things,so i want to find out,after drying them out they will be strongly and straight? or just were before?i mean, they are dry and crusted solid look to get in shape, or simply lose their natural color?
Hi! They were actually a little more fragile than before.
try oil based coloring, it should also preserve it better…
Washing soda is exactly the same as soda ash you put in your swimming pool. Check out the ingredients. Hope this is helping. And it’s much cheaper as actual washing soda.
So washing soda? Thats called baking soda? Correct? Im in north carolna. Never heard of washing soda and i really want to do this-like tom.
In the UK washing soda is called soda crystals and found in the laundry aisle, in 1 kg bags.
Back in the 90s I visited Louisiana and in a gift shop saw skeleton magnolia leaves…I have looked for the how to and this is the first time I have seen it. I have sense my visit moved to Louisiana and have all kinds of magnolias. Now I can create some of my own Skeleton Leaves.
Thank you.
I have seen skeletal magnolia blossoms. They were stunning and had an almost gauzy linen look to them. Still had their blossom shape or maybe they were reshaped? Think this process would work? Any ideas/tips???
Exactly what i was gping to try tom! Magnolia leaves this was first tree in minds
I’m sorry but what is super washing soda is that baking soda please let me know MARY JANE and thank you for sharing HOLLY BACKES AZORNIA dhbackes@gmail.com
Arm and Hammer makes washing soda, It is in the laundry booster section. It is not the same as baking soda.
You’re correct, Lori! I do hate that they make the boxes look so similar even though the super washing soda box is noticeably larger.
Do you mean baking soda?
Hi, Patty! Super washing soda is a detergent booster and household cleaner you can find in the laundry detergent aisle.
I’m from Croatia and nobody is selling “super washing soda” here.
hey! washing soda is actually different chemically from baking soda, but don’t worry, you can try baking soda into washing soda! essentially all you have to do is bake it at 400 degrees F for about half an hour. but i dug up a quick tutorial that explains it in a bit more detail, (so you don’t think i’m just making stuff up!)
http://naturesnurtureblog.com/ttt-turn-baking-soda-into-washing-soda/
hope this helps!
oops! i meant *turn* baking soda into washing soda!!
Come a 400° C? A 100° l’acqua evapora.
Wow I did not know that. Very interesting. Thank you for sharing that.
If you’re in the US and can get to a Walmart you can find Washing Soda in the store. Just ask management for help finding it if you must.
Super washing soda is sodium carbonate . A also known as soda ash. Na2CO3 is its formula. It makes dyes penetrate natural fibers and items more strongly. I looked up on Internet and found how to turn baking soda into sodium carbonate. Do your own research.
In Austria I just buy Soda
When drying my leaves I put them between 2 sheets of parchment paper & press with an iron set on medium. It keeps them flat & drys them at the same time.
Hey der I just luved dis…..i’ve been looking for this for soo long & nw I’m definitely going to try dis…bt I’ve a doubt about d washing soda…i cannot find it anywhere around soo can I use any other washing powder????
Just buy baking soda and dump it on a cookie sheet and spread it out and throw it in the oven at 400 degrees for about 30 minutes. I have made some in my toaster oven and it works great.
Thanks everyone for explaining the washing soda to all of us not in the US. Other than baking some baking soda (I assume this is sodium bicarbonate?) do I need to add anything else to it? Is anyone able to advise what is in the commercial washing soda?
Love this! Been looking for something outstanding for a collection of old frames. Ready to get busy with this.
What do you mean “moderation”?
Hello, Peggy! I approve comments before they are posted on my blog. This prevents spam comments or comments that aren’t family-friendly being posted without my knowledge. Great question!
Hi, Peggy! I’m glad you’re now able to use your frames.
oh these are so simple in design by nature and simply gorgeous. I just happen to have a brand spanking new house I will be moving into. I want to decorate with interesting and unusual things. I think this would be gorgeous, now to find the leaves. Thank you so much for the great tutorial and sharing.
You’re very welcome, Candy! These will be a great addition to your new home!
Thanks its a superb idea for home decoration i’ll try it soon i really loved it …stay blessed dear
Oh wow this is really cool I am going to have to try this!
This is really cool! I can’t wait to make some for my Easter decor.
I’ve always wanted to try this! I didn’t know what they were called either. And I don’t even remember where it was that I saw them, but I remember them!
Thanks for the awesome tutorial. I’m pinning it for later!
So pretty, I love that you can customize the color of the leaves.
What an awesome idea! I bet my little one would love collecting leaves and making these with me!
What a fabulous craft idea! I LOVE LOVE LOVE this! I think it would be a great project to do with my girls!
So cool! Love this idea. They turned out beautiful! Great job!
What a cool project! I love how it turned out!
This is adorable! I love looking at DIY crafting things but the thought of doing it myself makes me cringe! haha
This is way cool! I want to try it!
This is so cool! I love how you did this and the pictures are awesome. So creative and fun.
this is brilliant!! I love the end result.. its so pretty!!
This is incredible! I never would have thought to do that to leaves!
Just gorgeous! I so want to do this now!
I have always wanted to know how the leaves were reduced to their skeletons! Can’t wait to try this.
Ooh, this is such a nice, classy wall decoration! Who knew it would be so easy to create for yourself?
What an awesome project! Those skeleton leaves are gorgeous–but I don’t think we have any big sturdy leaves like that around this part of town.
Hi, Cathy! I don’t think the size matters, as long as they’re waxy and have veins. You can probably try maple leaves.
Hola, gracias por tan útil tutorial,,,pero se me ha hecho difícil encontrar la sosa,,,no se si es detergente para lavar o sirve también el bicarbonato de sodio,,yo trabajo en complementos( Acccesorios) para novias y otras
Hola Jacqueline,
Ella le respondió a Patty la misma preg
“Super washing soda es un detergente y limpiador para el el hogar que lo puedes conseguir en área [sección o pasillo] de detergentes”
Espero que esto ayude, es en Inglés!
http://naturesnurtureblog.com/ttt-turn-baking-soda-into-washing-soda/
cocinero el bicarbonato de sodio a 400* F para 30 minutos.
This is pretty much the coolest thing I’ve ever seen!
My son loves collecting big beautiful unique looking leaves. This would be a great way to have him help me on a decorating project.
These are super cool! They would go great in my powder room. Now I just need to locate some leaves under all of this snow!
Wow! Those turned out really cool, and the process definitely feels very scientific, though I can’t quite wrap my mind around why it works. Good job!
Rachel, when I was trying to find out how to do this, a lot of science articles came up. They were all too technical for me! Lol
This is amazing. I’d love to put them in a window as a privacy screen. Do you have any recommendations for getting them to stick to a window?
Hi, Kathy! The only thing I can think of is using a thin layer of Mod Podge or pressing them between two pieces of glass, but I’m not sure how well that would work.
Not sire how old all these comments are. For the window, I think acrylic sheets could be used for mounting. They can be cut to fit the window using some sort of homemade swivel latches to hold it in. It should be lovely. Wonder how they will hold up in a sunny window?
We have a large screened in deck that really needs decorating. When summer finally gets here I will have to try this. My leaves right now are under 1 foot of snow with temps under 0.
Hi, Trudy! I hope it warms up for you, pretty soon!
THis is so great!! Thank you for sharing!! i’ll be heading to my florist to see what I can find since we still have snow on the ground.
You’re very welcome, Pam!
Very Impressive!! I love leaves and nature and always have. I have always liked things like this too but never knew how to get to this point with them. Looks like a very simple process too. ALSO, I really don’t understand the purpose of the food coloring? Do you need to do this step? I do see there is a bit of color to them after this process but is it really necessary? Again, Very Nice Job!
Hi, Shirley! The step with the food color isn’t necessary. I added color to match the color scheme of the room. The tint is a little more difficult to see on the pc, than it is in real life.
I LOVE this! I think my 8 year old granddaughter will love doing this with me. I think from the looks of this, what you used was probably a Magnolia leaf. We live in a city called the Magnolia Capital of Oklahoma and have been associated with Southeastern Oklahoma State University since 1966. It is called the Campus of a Thousand Magnolias so I think I am in business with leaves! 🙂
Hi, Pat! I don’t think it was a magnolia leaf, but I may have to go back to the park and check. We’re in southern Florida and where I found them, there were all types of palm trees around. However, I think a magnolia leaf would work great! P.S. I’m originally from Lawton, OK! Yay!
Thinking about using elephant ears and split leave philodendron. Also have many and magnolia leaves. Anyway, when you put the leaves in the washing soda does it matter the size of the leaf? What I am wondering is what size pot yo use for split philodendron leaves since they are so large. But I think they would be beautiful.
Wondering if elephant ear leaves worked? Thanks to all for sharing.
Fantastic idea! How did you attach the skeleton leaves to the scrapbook paper?
Hi, Jessie! I just pressed it between a sheet of scrapbook paper and the glass on the frame. No glue at all.
I’d forgotten how to do this and also tried looking it up and only found something online written up in the 19th century that was so complicated I eventually gave up. So seeing yours on Pinterest sparked my interest immediately. Thanks so much, they’re perfectly lovely
Thank you so much, Denise!
So you don’t have to put them between 2 pieces of glass or plexiglass? I LOVE LOVE LOVE this idea! I love doing crafts of all kinds, and this just blew my mind! Thank you for posting! Going to look for palm leaves!
You’re very welcome, Brenda!
Pat, I thought it looked like a magnolia leaf also. Kendra, thanks for sharing your fantastic ideas. I am going to try this later in the year when it ‘thaws’ outside.
I’m glad you like it, Linda!
I love this project so much. I also pinned it awhile back and have been planning on doing this with my Mr. 6. We are big nature collectors since we do a daily nature study so this is perfect for us. I love your finished product. Beautiful! Thank you for the inspiration!
You’re very welcome, Lacey!
G’day What a GREAT DIY project I really enjoyed viewing today!
Cheers! Joanne
This is such a great idea! I love how it turns out – I would love to make some a put them in a frame on my walls!
I saw these on Hometalk the other day and thought they were just so cool!
I saw the results of my mother doing this about 50 years ago. Hers became completely skeletonized with nothing between the vains. I thought she only used bleach. Don’t know the concentration. I ran across then the other day pressed between the pages of an old photo album. As beautiful as ever.
Bellissima questa tecnica!Proprio un vrero peccato………..Non capire le spiegazioni!!!Soda…………Ma.Soda Caustica?!!!!!Chi lo sa!!!!!!!!Purtroppo,io non so l’Inglese!E così,non ci capisco nulla!!!!!UFFA!!!!!
Ciao, Paola! Non è soda caustica. E ‘carbonato di sodio o super soda. Questo è il link per il prodotto che ho usato:http://www.walmart.com/ip/Arm-Hammer-Super-Washing-Soda-Detergent-Booster-Household-Cleaner-55-oz/19407690. Mi auguro che aiuta e che si capisce la mia traduzione.
These are gorgeous! I love how you figured out a way that works for you! I would love to make some of these!
Hello,
Can i use baking soda?
what is the difference between washing and baking soda?
Hi, Hira! I don’t believe baking soda would work. I think super washing soda contains baking soda and some other ingredients.
washing soda = baking soda+heat. See here: http://www.mommypotamus.com/how-to-make-washing-soda/
I saw these on pinterest, and was dying to make them too. The tutorial I found was in Japanese, and the photos weren’t very helpful, so for a long while I was soaking leaves in baking soda waiting for the leaves to turn into skeletons. When that didn’t work, I got to searching the internet for how to make them. Thankfully, I was calling them skeleton leaves from the beginning so I found directions fast. Soon I was making them all the time.
I just wanted to share some things I have learned from making these. The leaves don’t have to be waxy, but those are the easiest to work with. When I started, I used cottonwood leaves, and they came out beautiful. But not all leaves work. I moved to Napa, CA and tried this with grape leaves, and they didn’t make it. You just have to try whatever leaves you want to and see what happens.
When brushing the flesh from the leaves, I first used a little paint brush, but I don’t the patience for that, so I switched first to a tooth brush, then to a nail brush with softer bristles. These worked great, and make quick work of removing the flesh from the leaves.
Not that it matters, but I bleach them after I make the skeletons out of them, and I use food coloring straight, rather then mixed with water for bold colors. I like jewel tones, so that works for me.
It’s so nice to see that other people love these beautiful leaf skeletons as much as I do! Thank for your post.
Hi, Laura! Thank you so much for the tips! I tried brushing the flesh off, but it was easier (and a lot faster) for me to run them under water.
So beautiful and delicate! The wonders of nature enhanced by artistry even after the leaf has died! Am looking forward to trying this. Thank you so much for posting.
Gracias por compartir , me encanta la forma fàcil e interesante, muchas gracias! lo probare.
Felicitaciones por compartir esta idea. Yo quisiera aplicar en mi taller de arte. Me pueden enviar a mi corroe los pasos por favor
Por favor yo también le solicito los ingredientes y el procedimiento para lograr transparentar las hojas. Agradezco mucho apoyo, anhelo lograr hacerlo.
Hola, Leti! Lo que usted necesita : Hojas de cera , olla grande , Agua (I usado 12 Copas ) , Súper sosa comercial ( I usado 2 Copas ) , pinzas de metal , colador , Bleach , un plato poco profundo , de color Alimentos , Rejilla
thanks for sharing. I’ll try surely
muy bueno, muy buscado…….mil gracias
after you get the flesh off how is there the skeleton and what the skeleton is mounted in how is that already there or do you mount it on something I really what to try this!!
Hi, Kara! The skeleton is the veins that are left behind after all of the skin is removed. The leaf is pressed between a piece of scrapbook paper and glass in a wooden frame to hold it in place.
hi there
i would like to know if I can change the super soda with similiar one,im in aportugal and that product dont exist here.
Thanks for your response
Hi, Silvia! I don’t know what can be substituted for super washing soda, but you can buy Arm & Hammer Super Washing Soda online.
Do you use green leaves freshly picked or dead/dried leaves? Or can you use either
Nancy, I used leaves that I picked off the ground, they weren’t completely dry but they were slightly brown.
Japanese Beetles will do the same thing! LOL
Hi, I’ve just subscribed to your newsletter. I love anything to do with craft or art. I used to make these leaves by just soaking in water & changing the water daily it was tedious. That was when I was in school & only peepal tree leaves worked. Your method is great thanks. And the leaves you used are from an almond tree. My neighbor has one, I always use them for flower arrangements. I’ve also made roses wit them when they’re that beautiful red. These almond trees are common here in the tropics. I’m from India- Mumbai. Happy crafting!
Hi, Lyn! Thank you for letting me know about the leaves. I wasn’t too sure.
muy bueno
I remember doing something like this a few years ago with ‘peepal’ leaves (that’s what its called in India; botanical name is Ficus religiosa). All I did was put the leaves in water for a couple of days, and after that slowly rub the skin of the leaf off (putting them under running water might also work). This method is much easier than the one you’ve given. 🙂
Hi, AJ! Thank you for the tips!
where can you find the washing soda?
Hi, Angel! You can find super washing soda in Walmart in the laundry detergent section. I used the Arm & Hammer brand.
what will you use to dye the leaf skeleton?
Hi, Angel! In the tutorial, I used water and food coloring.
me gusto lo de las hojas lo que si mi duda es de la soda aqui en chile no se como la puedo encontrar ya que los nombres de los productoa varian dependiendo del pais o si puedes enviar una foto del compuesto del producto
seria genial de ante mano muchas gracias
I am really goung to have to try this too!
I too have seen and admired them but tge ones i saw were all different types. I dont know what time of year it was when they made them. Does it make a difference or can they be done at any time?
Hi, Lisa! The time of year doesn’t matter. I made these during the spring. Now that it’s fall, I bet you can find plenty of leaves to use.
I’ve wanted to make these for the longest time!!! I live in Louisville, Kentucky and have never found the washing powder, do you think borax would work? One of my good friends is from Lawton, Ok!!
Hi, Courtney! It’s a small world! Super washing soda is a detergent booster. You can find it in Walmart in the laundry detergent section. I used the Arm & Hammer brand. I’m not sure if borax would work.
Wonderful ,thank you darling !:)
You’re very welcome, Lucy!
Hi! Love this project idea. I know what I’m doing this weekend! Still, I am a little slow… I don’t get what super washing soda is specifically. Will you share exactly what I am looking for? Thank you so much.
Hi, Kelly! Super washing soda is a detergent booster. You can find it in Walmart in the laundry detergent section. I used the Arm & Hammer brand.
I can’t wait to try this. I want to bring some leaves home from our vacation in Costa Rica,rainforest. However, don’t see anywhere In the comments, if it’s best to work with fresh leaves, or if you can use dried leaves?
Hello, Judy! Some of leaves I used were on the ground and starting to dry and brown.
Hello, I really like such crafts!!! and I want to do thias!
which kind of bleach do you use?
I have to buy this in Germany.
Thank you very much!
mARTina
Hi, mARTina! I used Clorox bleach.
Could you use baking soda instead of super washing soda?
Once you have the finished product, do you think you would be able to decoupage them and make a bowl from the leaves?
It’s very nice tutorial and I can’t wait, I try his it’s very awsm. Thanks for sharing.
.
hello friends ,this activity is cool must try
So nice.. I always try to make it
Bt my process was so long
Thanks for this.. so now I can make it in jus few hours
se me urge aclarar el nombre verdadero,,,es sosa oes soda, y se puede usar detergente para lavar mas klorox’?
I just adore this! You are so very creative and this is amazing!! A few quick questions…
How long do they keep in the frame?
Can you do this with flowers?
Can you secure them with glue or wold that damage the leaves?
With the tinting, can you use gel colors or just liquid?
I just think the way you laid this tutorial out was brilliant and easy to follow!!
Thank you so very much,
A curious new crafter!
Thank you, Carliena! I’m glad you liked it!
What is SUPER WASHING SODA please?
Hi, Laura! It’s detergent booster that you can find in Walmart in the laundry detergent aisle. It’s an Arm & Hammer box.
Thank you for sharing your information on how to do this. I have only seen leaves like this on river banks or near a lake, but it also depends on the time of year when you see them, however, by the time I find them and bring them home , I just have crumbs, lol. So I thank you again. I WILL be doing this.
Yours truly Charmaine M.
You’re very welcome, Char!
Hi i was wondering what i would use instead of Super Washing Soda as i live in the uk and would need to order in from us amazon?
How did you get them to stay on the paper? Are they behind glass? Very nice idea. It would be just my luck I would tear the leaves but it would be nice to give it a try. Our granddaughter just moved into their new house would make a nice house warming gift.
Hi, Cynthia! I just pressed them between the glass and the backing of the frame, without using glue. I hope your granddaughter loves your gift.
This is an amazing idea! I want to ask though… do you need to preserve the leaf after you’re done so that it doesn’t crumble or change shape with age? I also wanted to know if you know if a Protea flower’s leaf is a suitable leaf to try this with?
Love this my favorite season is autumn and I love cooking so i decided to decorate my kitchen in an autumn theme and I love it so I will be doing this for my kitchen thanks so much for sharing
Hi! I love these! It’s a great gift for friends. You’re so kind person that I want to hug you lots. I have a question – can I use washing powder against washing soda? Will the results be the same?
Sorry, I meant *instead*, not against
QUE BONITO, ME HE QUEDADO CON MUCHO INTERES SIGUIENDO TUS INSTRUCCIONES Y.. MANOS A LA OBRA!
GRACIAS POR COMPARTIR
Hi Kendra, In Europe is a cheap and good brand Klok or Driehoek. Don’t forget the prices in Europe are much higher than USA. Aldo it’s the same, we have to deal with price +tax. And USA is a “whole-user+ no tax”
But the “washing soda works great”.
I want to show you this….. I made little paintings/ art of these skeleton leaves!
Here is the How to……
https://youtu.be/LzW69eQNpjY
Thank you.
Found this on Pinterest. Want to do it. But: What is a Colander ? 🙂
I am from Sweden and have no idea.
Marianne
Hi, Marianne! A colander is the same thing as a strainer, like when you strain the water from pasta.
MUY interesantes, pero PODRIAN DAR LA POSOBILIDAD DE TRADUCIRLO Y PODER LEERLO EN ESPAÑOL.
Hi. You could also try using that ‘murky water’ as a natural dye for fabric or wool 🙂
Yes! Fantastic idea! I’m happy to have the tutorial for the leaves, but hated the idea of just tossing out that natural color that the leaf worked so hard to put there…;) I’m going to try dying some homemade paper, though, I think, rather than cloth. Or maybe bleached cotton cord? Like the kind sold for packaging? Thanks for the idea!
Hi, I was just wondering if after I brought it to a boil could I put it in a slow cooker on HI for the 3-4 hours? Instead of on my stove? These are gorgeous.
Do you think these could be ‘painted’ with clear resin? These are beautiful, I’d love to be able to use them on a wreath.
thanks a lot for your kindness education. in a photo after drying it, it seems to be so shiny and glassy. would you use of crystal sir vernier?
Hi! I didn’t add anything extra to them to make them shiny. It may depend on the type of leaf used.
Hello. I was wandering the amount of ingredients for say like 4 – 6 leaves
Great post, I can’t wait to try it. BTW, I think I recognize your leaf as a Fig Leaf Ficus.
im from VIETNAM and i really love your share about thought of the leaf. THANK YOU VERRY MUCH :X. hope you allways happy and beauty with your life :X
Thank you for sharing this technique, I love the way they came out.
What a super project to do and they came out beautiful too!! I hope to try these, now that fall is upon us on the East Coast in CT. I’ll even make the frames out of old barn wood or use chalk paint and distress the frames. Thanks for a great tutorial!!~Dolly
Will it work for dry leaves?
Hi, Jane! The leaves I used were dry. I picked them up from the ground.
Thank you so much!
hola me agrado este procedimiento pero m quedo un poco de duda cuales son hojas de cera o puedes ussar de cualquier hoja
y tu procedimiento me quedo un poco confuso las pones en el agua calente o fria o hirviendo
si es posible me lo puedes mandar a mi correo tus instrucciones por favor
gracias por tu atencion
for your viewers, super washing soda can be purchased at walmart and it is very inexpensive.
hope this helps. 🙂
That is so simple and I have always loved the skelton Leaves only I have always hunted for mine in the Fall or spring time. Wow What a shortcut!…….I have a question…….I have many, many, dried leaves. Could one do the same procedure with them to make the skeltons? Just wondering. I don’t have a use for the pressed leaves or flowers and would like to do something different with them. Thank you so much for the Tuteral.
Hello, Jeannette! I actually found these leaves on the ground, as well. They weren’t fresh from the tree and some were a little dry already. Maybe if your leaves are the thick waxy type they’ll work.
E de enaltecer, que divulgues estes conhecimentos. Vou tentar fazer. O meu obrigado.
Seja bem-vindo!
My physician’s office has pictures of x-rayed flowers and leaves that are breath taking. Your skeleton leaves are a close cousin! My lifelong friend lives in Durant, Oklahoma….City of Magnolias. I’ll have her send me a box of leaves! What a great project…and thanks for the simple and straightforward instruction. Your results are stunning.
You’re very welcome!
Fig leaves are quite tough/durable & have an interesting shape. I have a feeling they would be a good candidate for this process. I think I will try some during the summer…and maybe again when they turn yellow & start to fall off the tree in the late fall.
I bet they’d turn out beautifully, Patrick!
thank you teaching me!><
You’re welcome!
Love this idea! I was wondering if I could paint on the leaf after it’s dry. I could use craft paint or acrylic, painting a tree within the leaf! I haven’t made a skeleton leaf yet, and wondered before I do.
Hola,
What kind of leaves do you recommend to use?
Hi, Ruth! I would suggest any type of broad waxy leaf.
hii,
i had a doubt the food color that u use in this is just too add a little tint to the leaves is it?
n after removing the leaf from the color solution do v have to run it under water again or there is no need for itt?
Hi, Anisha! The food color is just to add a little tint. I wanted it to match the room I have them in. I didn’t run it under water again. I let it dry on a rack.
Great post! Thank you for sharing your experience with us!
What are the safety and other precautions with this activity ?
Hi, Jorge! You should be in a well-ventilated area and use goggles and gloves.
Hi does anyone know how to do this in the UK ?
This is so cool! My son and I are going to do this for a science project. My question is: I don’t have a hand held sprayer from my sink, how else can I remove the skin? Have you tried any other way?
Long, long time ago . . . I made these when I was young with no boiling, no chem agent. Just tapped on the leaves repeatedly with my dad’s bench brush. (Or foxtail, as they said in the Navy.) Seems like the leaves were set on a surface with some ‘give’, like a folded towel. Rather time-consuming, but that’s a good thing for keeping a young teen busy, right? When they looked right, I was done – no additional steps for drying or rinsing, although pressing until dry sounds like a good idea. As I recall, they came out just a magical-looking as these. I know I was quite pleased with myself for some time. I don’t remember having a problem with ripping. I probably used maple and oak leaves, since that’s what was in my back yard. Depending on how much leaf material you tap off, I would think they micht even retain some natural fall-colors tints.
I’ll have to try this. Amazingly simple steps, thank you!
Hi there these are beautiful. Could Magnolia leaves work since they are really sturdy?
Thank you very much, I am an artisan from Brazil and I have already seen this work on the internet for a while and I tried to do it but with no success.
I’ll try again. tanks
Amazing thing¡ I would love to add this to my art work of mixtures of painting and “things”. The Spanish name for the basic component of the Super Washing Soda (sodium carbonate) is carbonato de sodio, which is is not that easy to get in this far away from everywhere place where I live here in Chile. There is any other common and regular product that I can replace it with? (baking soda, fon instance?). Lovely work! Thank you for sharing it!
Washing soda is sodium carbonate. Baking soda is sodium hydrogen carbonate, so they’re two different chemicals. Some recipes call for baking soda instead but it doesn’t seem to work as well as washing soda.
Also, that looks like the leaf from the tropical almond tree, Terminalia catappa. Definitely not a palm.
Nice
Kendra!!! You must see what my mom does with these skeleton Leaves!
We live in Brazil, and she started with this kind of Craft to fight against an emotional depression. This was 20 years ago.
She has a facebook and Instagram profiles. I think you would love to see her beautiful things!
Search for: FEITIÇO DAS ROSAS on Facebook, and MAJO KIMURA on Instagram.
She just sent me the link to this tuttorial, and asked me to translate.
She likes to learn and learn new techniques.
Thanks a lot.
This is so neat, I’m going to have to try it as soon as possible! Thanks for sharing the process!
This is so beautiful! I’ll be trying with my niece 🙂 Thanks for sharing!
@Kendra
Bonjour, It looks so beautiful. Thank you for sharing such a beautiful idea. I will try it and decor my living room.
Hey Kendra, thanks for sharing an idea of skeleton leaves. I tried the method you used for making skeleton leaves and it really worked. It is really the best craft idea in the season in Winter.
@Kendra You nicely described this craft. Truly appreciate and enjoyed this beautiful craft. Looking forward to more such DIY crafts in the future too. I am pretty impressed by your efforts. Thank you so much for sharing.
Hello Kendra,
Skeleton leaves are made by removing the leaf tissue from certain varieties of leaves without damaging the intricately laced veins. Thank you so much for sharing this post, I appreciate your work. It was a great informative post. Love to come here again.
Thanks for this blog post. Almonds are quite useful that I got today due to this.