
DIY Elmo Piñata

My oldest is turning two and what better way to celebrate a birthday than with a piñata? Kids hitting their favorite characters with sticks, candy flying everywhere, and a stampede of little ones rushing to fill their bags.
Oh, the joys of childhood!
Lately my son has been into Elmo, so I decided to give him a diy Elmo piñata. Last year it was Mickey Mouse and it was my first attempt at making one and I didn’t do half bad. You can see the pics here.
I never got around to making a tutorial for that one (plus it took a little more time to make), so I wanted to share how to make an Elmo piñata with you all. Enjoy!
Supplies for DIY Elmo Piñata
- Cardboard Box
- Hot Glue Gun
- 3 Sheets Tissue Paper
- Mod Podge
- Sponge Brush
- Construction Paper (White, Black, Orange)
- Glue Stick
- Hole Punch
- Twine
How to Make an Elmo Piñata
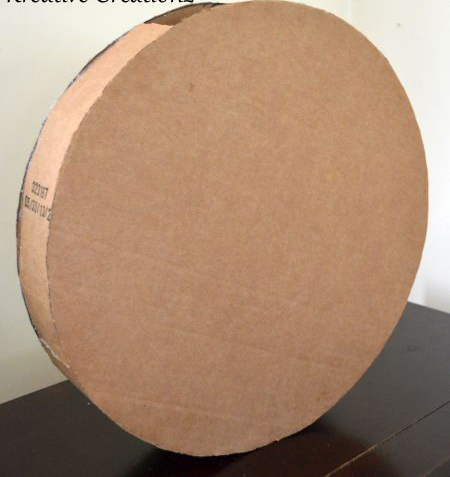
I traced two large circles onto the cardboard and cut them out.

I cut one long 3” wide strip of cardboard out of my scraps. The length will vary depending on how much around you need it to be.
I bent the strip in small sections so it will roll easily around the circle cutouts.

I used the preheated glue gun to attach the cardboard strip to the inside edge of one of the circles. After the glue dried, I glued the second circle to the other side of the strip.
Make sure the strip doesn’t close at the top because you need a place to add the candy. This is what it should look like.

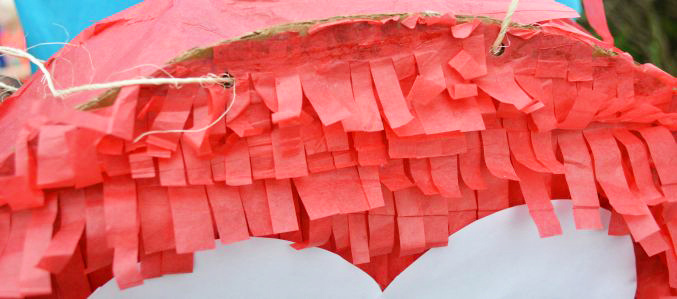
I cut a 2” piece of tissue paper length-wise. Next , I cut slits ¾ of the width into the paper all the way to the end of the strip. I used Mod Podge to glue the tissue paper down, while layering each consecutive strip.
I did that until the front was completely covered. For the sides and back, I just added one layer of tissue paper.

I used construction paper to trace and cut out the shapes for the eyes and nose. I freehand drew the mouth and used the glue stick to attach them all.
I used a hole punch to make two holes on the front top and the back top of the piñata to slide the twine through so it could be hung up.


I have a daughter who will turn 2 in June, this is SO perfect for her! Thanks
Elmo is always awesome. This pinata looks easy enough for me to try. Thanks for the DIY!
So cute! My oldest would love this! I think I need to get daddy to make it though I’m terrible at crafts.
This sounds like so much fun 🙂
This is so cute and creative! I would have never thought to make my own pinata!
This is so amazing! Totally inspired me. 🙂 Thank for sharing, and I’ve pinned for future reference!
my niece loves elmo! what a great idea!
Loving this elmo piñata! So so cute and kids love to hit things haha
Looks awesome and it’s so so cute! It makes me wish I had an Elmo fan.
This is such a cute idea! My daughter doesn’t care for elmo, but we could do so many other cute designs!
This is so adorable and.looks like so much fun bet any toddler would be happy hitting this.
What a cute pinata! I had no idea that they were in so simple to actually make. I totally am gonna make one! Not Elmo though, my daughter will be 13. 😉
Aw, this is so cute. My son used to love Elmo when he was little. He called him “Mo Mo.” Pinatas are always fun!
You did such a great job on this pinata! I love saving a buck by making things myself. You really nailed it.
It would be nice to make your own pinata that the kids can have fun with during parties! I love this Elmo one, he’s one of my favorite characters!
I’ve never made a pinata in my life and it’s always been something that I’m interested to do especially when we plan kids’ parties at home! I think it’s awesome that you’re sharing a quick way on how to make one!
This is so cute! I have seen so many pinatas when I was in South America but I didn’t know that I could do one myself. It’s such a great idea for a kid’s party!
Oh my goodness who doesn’t love Elmo! What an awesome idea for a pinata!
How cute is this! I totally need to try to make one of these the next time we have a party for the kids.
This is such a good DIY for a party! Elmo is always a hit with the kids, including myself when I was young.
This is so creative! Love how it looks store bought! I would have never thought of making my own pinata!
This is such a cute idea and it turned out so nicely!
This is so much fun!! I love Elmo and DIYs are always my favourite thing to do in my down time.
This is easier to make than I thought. This would be perfect for a kid party!
This is so cute. And it’s not as hard as I always thought it would be to make
This is so good and beautiful. My kiddo will be 2 soon and I think he will love helping me making this and will then enjoy playing with it too. Thanks for the idea.
This looks so nice, I always thought making these was such a lengthy process. Thanks for sharing.
Oh my goodness…that looks so easy! I love some arts and crafts and this looks like something I would totally do. Thanks for the great idea!
Love, love this post. My daughter made one for a school project and it looked so cute too. My girls were always a huge Elmo fan when they were smaller. You did such an amazing job!